Authentication with OAuth 2.0
This section describes how to configure a TQ Data Foundation server to use OAuth 2.0 for authentication. This is an authentication method that API clients can use to authenticate with Data Foundation.
API clients request an access token from an Authorization Server, and then send the token with each request to Data Foundation APIs. Data Foundation acts as a Resource Server: it validates the token and reads the client’s identity and roles from it. Data Foundation contacts the Authorization Server only to read its OpenID Provider Configuration and the public keys that Data Foundation uses to validate tokens.
Data Foundation accepts any signed JWT access token issued by a configured Authorization Server, regardless of the OAuth 2.0 grant type the client used to obtain it. See Choosing a grant type for guidance on choosing a grant type.
Data Foundation itself can also act as an API client that uses OAuth 2.0 authentication, in particular when accessing another Data Foundation instance that requires authentication with OAuth 2.0. For example, to publish to Explorer using OAuth, see TQ Data Foundation as an OAuth API client for configuring Data Foundation as an OAuth client.
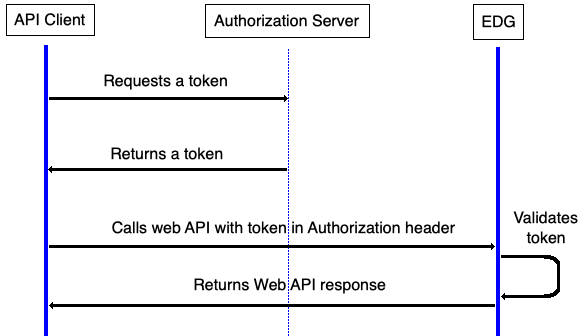
OAuth 2.0 Client Credentials Flow
Considerations
With OAuth, API clients that can access Data Foundation are managed in the identity provider. With HTTP Basic Authentication, they are managed by the Data Foundation administrator in a configuration file.
OAuth is more secure than basic since credentials are not sent with every request to Data Foundation
OAuth can be complex to implement since it is a multi-step protocol that involves an additional party (the Authorization Server) and there is considerable variation between providers.
End-users logging in directly to Data Foundation cannot use this authentication method. It is for authenticating API clients only. See Authentication with OpenID Connect (OIDC) for a related SSO end-user authentication method.
Choosing a grant type
The grant type determines how the API client obtains the access token. It is configured between the API client and the Authorization Server. Data Foundation itself needs no grant-specific configuration.
- Client Credentials
For unattended clients such as scripts, scheduled jobs and other servers. The client authenticates to the Authorization Server with its own client ID and secret, and the token represents the client itself. Data Foundation treats the client as a service account. Assign the client a role that is listed in serviceAccountSecurityRoles.
- Authorization Code with PKCE
For interactive clients that act on behalf of a signed-in user, such as desktop tools and AI applications. The user signs in at the Authorization Server in a browser, and the token represents that user. Data Foundation grants the user’s own permissions, based on the roles in the token. Licenses that restrict API access to service accounts do not apply to these tokens. The TQ MCP server uses this flow. Register the client at the Authorization Server with the redirect URI the client uses, and make sure the access token carries the claims described in Access token requirements.
Prerequisites
The Data Foundation administrator must obtain the Authorization Server’s OpenID Provider Configuration URL (ending in
/.well-known/openid-configuration).The administrator should obtain all client IDs that will be used to access Data Foundation, to facilitate configuration of access control.
The access token issued by the Authorization Server must provide an attribute to be used as the user’s role within Data Foundation
Configuring TQ Data Foundation as a Resource Server
Note
When configuring this method of authentication, it is helpful to have a technical resource familiar with the OAuth 2.0 Authorization Server to assist with the configuration. TopQuadrant is unable to assist with specific configuration options for each customer’s Authorization Server.
To enable OAuth 2.0 authentication, add or uncomment in the setup file (edg-setup.properties):
apiAuthMethods = oauth2
Also, create a oauth2.yaml file according to the following section.
The oauth2.yaml file
By default, the system will look for a file oauth2.yaml in the same
directory as the setup file.
If desired, the name and location can be overridden in the setup file:
oauth2ConfigFile = ./my-idp-oauth2.yaml
Syntax
The file uses YAML syntax. In its simplest form, it consists of a single OAuth 2.0 configuration record:
authorizationServer: https://your.authorization.server
attributeMappings:
   role: auth-server-role-attribute
To accept tokens from more than one Authorization Server, give each record a unique name of your choice. Data Foundation selects the record whose Authorization Server issued the incoming token, by comparing the token’s iss claim with the issuer in each server’s OpenID Provider Configuration:
configuration-name-1:
   authorizationServer: https://first.authorization.server
   attributeMappings:
      role: auth-server-role-attribute
configuration-name-2:
   authorizationServer: https://second.authorization.server
   attributeMappings:
      role: auth-server-role-attribute
      name: auth-server-name-attribute
A record consists of these elements:
authorizationServer(required)The base URL for the Authorization Server. This is the part that precedes
/.well-known/openid-configurationin the Authorization Server’s OpenID Provider Configuration. Theissuerin that configuration must equal theissclaim of the access tokens. See below for examples.attributeMappings(required)This maps the claims in the access token to attributes understood by Data Foundation. The left-hand values are Data Foundation attributes; the right-hand values are access token claim names.
The following Data Foundation attributes are supported:
role(required)The access token claim containing the client’s group(s) or role(s), to be used as Data Foundation security roles. If the token does not provide a suitable claim, the client ID claim can be used (see examples below). Only values that match the securityRoles field in the setup file are used.
name(optional)The access token claim to use as the user or service account name in Data Foundation. Defaults to
sub(subject) if not specified. Theclient_idorazpclaim is sometimes a suitable alternative for Client Credentials tokens.
Note
If the client ID claim is mapped to role, then any client IDs used to access Data Foundation must be added as securityRoles.
Access token requirements
Data Foundation accepts an access token when all of the following are true:
The token is a JWT signed with a key published by the Authorization Server’s JWKS endpoint.
The
issclaim matches theissuerin the OpenID Provider Configuration of a record inoauth2.yaml.The token has not expired, and its
nbftime, if present, has passed.The token contains the claim mapped to
name, orsubifnameis not mapped. A token without it is rejected with HTTP status 401.
Data Foundation then reads the claim mapped to role. The claim can hold a single string or a list of strings. The mapping can name a top-level claim, or a dotted path to a claim nested inside another, such as realm_access.roles. See Assigning Security Roles in the Identity Provider for how to emit a suitable claim.
Example oauth2.yaml file for Okta
authorizationServer: https://your.okta.com/oauth2/default
attributeMappings:
   role: cid
Example oauth2.yaml file for Amazon Cognito
authorizationServer: https://cognito-idp.us-east-1.amazonaws.com/us-east-1_xxxxxxxxx
attributeMappings:
   role: client_id
Example oauth2.yaml file for Microsoft Entra ID
authorizationServer: https://login.microsoftonline.com/xxxxxxxx-xxxx-xxxx-xxxx-xxxxxxxxxxxx/v2.0
attributeMappings:
   role: azp
Note
If using Microsoft Entra ID as the Authorization Server, you will need to configure the Data Foundation app registration to use version 2 tokens:
Go to App Registrations in Entra ID
Select the Data Foundation app
Select Manifest
- Change
"accessTokenAcceptedVersion": null,- to
"accessTokenAcceptedVersion": 2,
Save
This is due to a bug in Entra ID which affects token validation using third-party JWT libraries. Unless you set accessTokenAcceptedVersion to 2, it will default to issuing version 1 tokens, which use a different issuer ID, which causes validation to fail.
Example oauth2.yaml file for Keycloak
authorizationServer: https://your.keycloak.server/realms/your-realm
attributeMappings:
   role: realm_access.roles
   name: preferred_username
Keycloak sends the realm roles of the user or service account in the nested realm_access.roles claim of the access token; see Keycloak. For Client Credentials, Keycloak sets preferred_username to service-account- followed by the client ID.